Lightroom has a Maps view, but I have never really used it before. While all my smartphone photos are automatically geotagged, the 80% of my photos shot on my dedicated camera (Sony A7Rii) lack geodata. I have historically neglected adding geotag info as I have imported photos through the years. As a COVID lockdown project, I decided to try using the location tracking data from Google Timeline to geotag my photos “automatically”.
Download your location history from Google Takeout
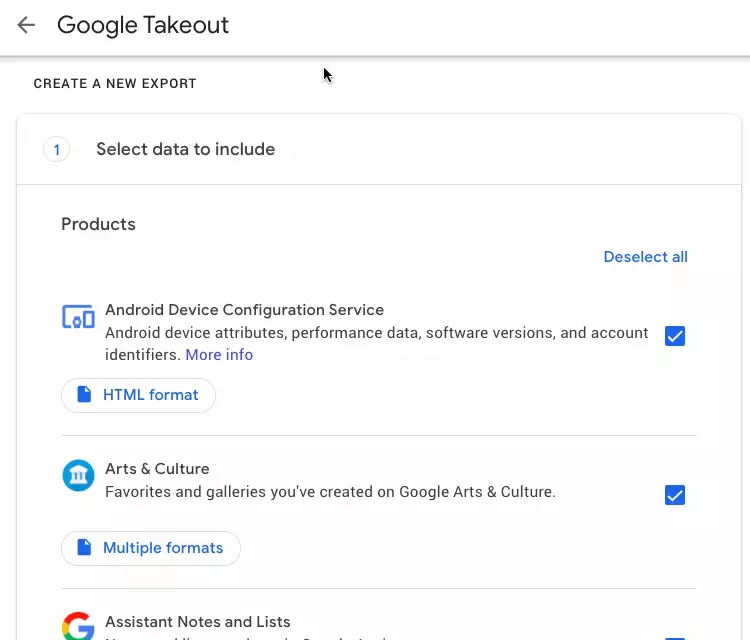
The Google Takeout tool lets you export your data across a variety of Google services. We are only interested in our location history, so click Deselect all and scroll down to the Location History section.
You’ll receive an email a few minutes later with a download link. After you unzip it, you’ll find a large JSON file. Depending on how many years you’ve had Location History enabled, the file may be quite big. Mine was ~ 600 Mb for six years of data.
⚠ Note that while the Google Timeline UI displays your location history in local time, the JSON export contains timestamps stored in UTC time. This will be important later.
Convert it to gpx format, and split be year
Google Takeout gives us our location data in a JSON format, but most map software—including Lightroom—expects a GPX format. Luckily there is an excellent location-history-json-converter python script available on GitHub which solves our exact problem.
I recommend splitting your location data by year to ensure the files are reasonably small. If you live in a timezone which observes daylight savings time, you will need to read each year’s file three separate times into the Lightroom plugin, setting the appropriate timezone each time. Even with a year of data, there is a 20-30 second lag when reading the file using the Lightroom plugin. This is annoying, but manageable.
Here is an example of the terminal commands to convert your JSON export into yearly gpx files:
# make a working directory to keep things together
mkdir location_history && cd location_history

# move your downloaded json file into our directory
mv "~/Downloads/Location History.json" location_history.json

# download the conversion tool
git clone https://github.com/Scarygami/location-history-json-converter.git
cd location-history-json-converter

# perform the actual conversion
python location_history_json_converter.py ../location_history.json 2018.gpx \
	-s 2018-01-01 \
	-e 2019-01-01 \
	-f gpx
Download Lightroom plugin
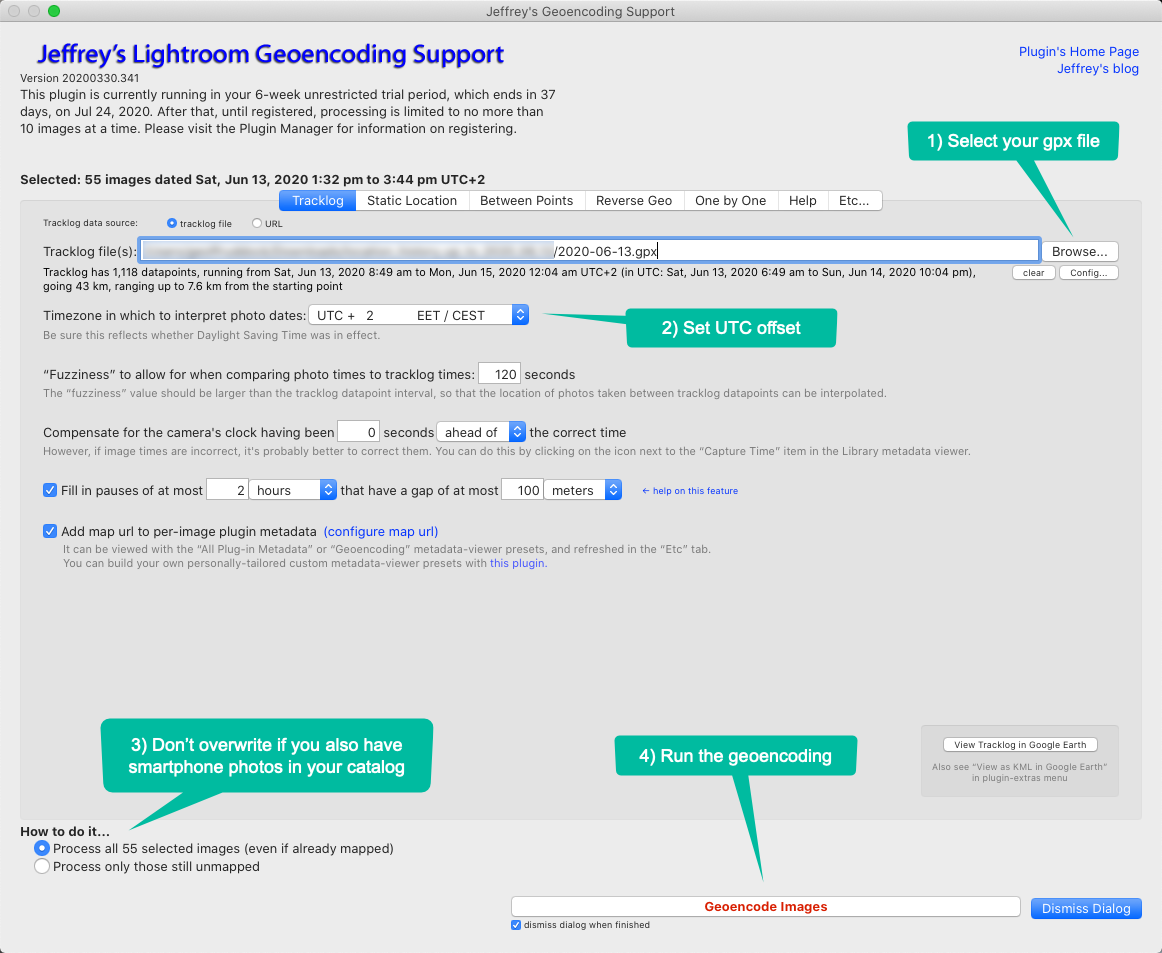
Jeffrey Friedl—the king of Lightroom plugins—has an excellent geo-encoding plugin which handles most of the heavy lifting for us. It has a plethora of settings including fuzzy matching—which is important since smartphone GPS samples less frequently than a dedicated hiking unit—and so the location data frequently will not match our photo timestamps exactly.
Fix your timezones
If you’re like me, you may have been lazy with keeping your camera’s cock up-to-date with daylight savings changes, or when traveling in a different timezone. If you geotag all your photos in a single batch, you’ll likely notice that many photos fail—even with fuzzy matching enable—and others are placed in an entirely wrong location.
Here comes the un-fun part. Crack a beer, put on some music, and spend a few hours working through your Lightroom catalog side-by-side with your Google Timeline. Here was my rough workflow:
- Find an image that is of an identifiable location, then cross-reference with Google Timeline to discern whether the timestamp is correct.
- Select an entire batch of photos (same trip), and adjust their timestamps in Lightroom using
Menu → Metadata → Edit capture time → Shift by set number of hours. - Mark down the UTC offset for the date range of photos you processed, since you’ll need to enter this value when running the geo-encoding plugin.
Geotag your photos
You’ll need to work in batches, one for each timezone your photos were taken in.
- Bring up the geocoding prompt in Lightroom from
Library → Plugin extras → Geoencode. - Select the gpx tracklog file corresponding to the year of the photos you are encoding. It may take 20-30 seconds to read the file before allowing you select options.
- Set the UTC offset for the batch, keeping in mind daylight savings time.
- If your photo library also contains smartphone photos, you probably don’t want to overwrite their location info. In this case, make sure to select Process only those still unmapped.
- Click Geoencode images and take a deep breath.
- Pay attention to the summary prompt → If more than 30% of photos failed, you may have missed a timezone problem.
Tidy up metadata
After running the geocoding, head over to the Maps view and spot-check the results. If your capture times and UTF offset are correct, most of the photo locations should be reasonably accurate. There will still be some weird results, simply because the raw GPS data sometimes “jumps” around—particularly when you are in rural areas and/or hilly terrain. You can tidy those up in a couple ways:
- Right-click on image → Metadata Presets → Copy Metadata → GPS, then paste onto other image.
- Select images → Right-click on map to set GPS.
- Simply drag the photos from the film strip onto location on the map where they belong.
Reflections
Was it worth the effort?
I spent significantly longer on this little project than I expected to. Nevertheless, I think it was a worthwhile endeavour. Here are my takeaways:
- In the future I will be more vigilant about updating my camera clock when traveling, or when DST changes. I set a recurring Google calendar event for the latter.
- When traveling somewhere where I do not have a data plan, I should disable roaming rather than putting my phone in airplane mode, since the latter disables GPS as well.
- Ideally I should perform geotagging as part of my regular editing workflow, rather than doing it all at once.
I haven’t found a perfect solution for #3 though, since downloading my entire location history and converting it is a hassle, and not something I want to do after every day trip. In the future, I may write a script which uses Google APIs to schedule an export, convert to gpx, split into daily files, and drop it somewhere in Google Drive.
What about daily exports from Google Timeline?
Google Timeline’s web UI contains an option for exporting a single day to a KML file, but yields less accurate data than the JSON export from Google Takeout. The JSON export contains raw GPS readings, while the KML export contains the more processed data that you see in Google Timeline, where it aggregates points together into inferred paths and journeys.
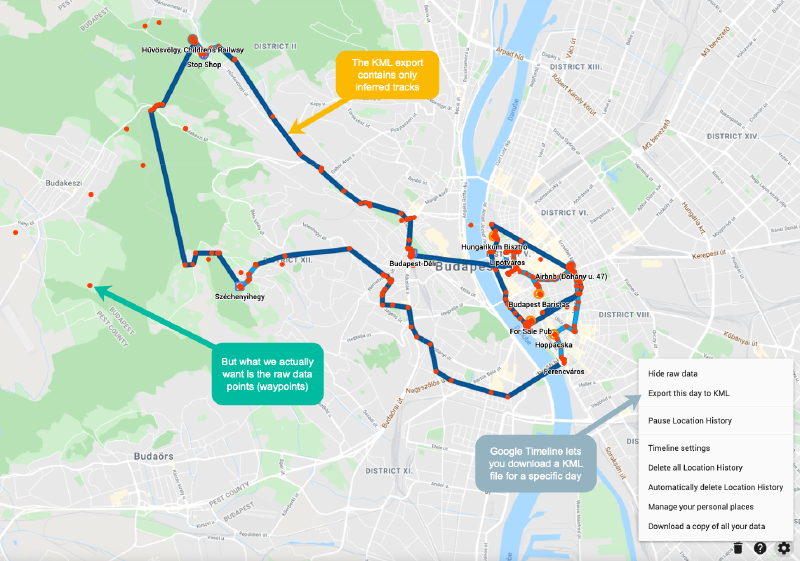
Raw GPS data can be noisy, but arguably that’s what we want here.
In the KML file, the raw measurements are grouped by route with a start and an end timestamp. This presents two problems:
- Google uses a non-standard format which is not easily converted into a gpx file with GPSBabel.
- Raw measurements are no longer associated with specific timestamps, they could be anywhere between the start and end timestamp of their grouping. 1
Here is an example of the data format. While it is theoretically possible to write a script to convert this into a valid gpx format to mitigate problem #1, I’m not sure this would be worthwhile, since the timestamps would still be less accurate.
<Placemark>
  <name>On the subway</name>
  <address></address>
  <description> On the subway from 2020-06-13T14:00:10.523Z to 2020-06-13T14:04:13.078Z. Distance 2753m </description>
  <LineString>
    <altitudeMode>clampToGround</altitudeMode>
    <extrude>1</extrude>
    <tesselate>1</tesselate>
    <coordinates>13.401893,52.475390999999995,0 13.401893,52.475390999999995,0 13.3918281,52.4985295,0 13.391048022278145,52.49785324977018,0 </coordinates>
  </LineString>
  <TimeSpan>
    <begin>2020-06-13T14:00:10.523Z</begin>
    <end>2020-06-13T14:04:13.078Z</end>
  </TimeSpan>
</Placemark>
Reverse geo-encoding
Reverse geo-encoding populates fields like City, State and Country based on the raw GPS data. Lightroom has built-in reverse geo-encoding, which I find satisfactory. But Jeffrey’s plugin can also perform reverse geo-encoding using Google location data. Apparently it is much more accurate. A key feature is that you can specify a My Maps file with custom-named locations, and the plugin will use those location names whenever possible.
The plugin can reverse-geocode via both Google and OpenStreetMap, though in order to use Google, you must create a developer’s API key, and enter that into the plugin in the Plugin Manager. (The egregiously-complex steps needed to create the Google API key are beyond my ability to explain as of yet, sorry.)
To use this feature you need to first set up a Google Cloud Platform account, then generate an API key, and enable the Geocoding API. Keep in mind that a large quantity of requests could cost you. GCP does give you $200 in free monthly credits for maps-related APIs though, which translates to roughly 40k requests. Definitely enough for occasional use, just take care not to reverse geo-encode your entire photo library in a single month.
Further reading
Guide to geotagging photos with Google location history and exiftool – A guide for geotagging using exiftool rather than Lightroom.